CockpitにGoogle Authenticatorを用いたOtp認証を導入する方法
Cockpitのセキュリティ対策としてGoogle Authenticatorを用いたワンタイムパスワード認証を導入したい。以下に対応方法をメモ。
事前準備
Cockpitについて
Cockpit自体の導入方法については過去記事参照。
Google Authenticatorのインストール
ワンタイムパスワード認証についてはGoogle Authenticatorを利用するため以下からアプリをインストールしておくこと。
iOS
https://apps.apple.com/jp/app/google-authenticator/id388497605
Android
https://play.google.com/store/apps/details?id=com.google.android.apps.authenticator2&hl=ja
ワンタイムパスワード認証導入
サーバへGoogle Authenticatorのインストール
サーバへSSH接続し以下コマンドを実行する。
#epalレポジトリの指定
dnf install epel-release

#google-authenticatorのインストール
dnf install google-authenticator
ワンタイムパスワードの初期設定
引き続き以下コマンドを実行する。
#ワンタイムパスワード認証を設定したい一般ユーザー(root以外の操作ユーザー)に切り替え
su - test_user

#ワンタイムパスワード初期設定
google-authenticator
以下が表示されるのでyで進める(コメント部分は翻訳した内容)。
#認証トークンを時間ベースにしますか? (y/n)
Do you want authentication tokens to be time-based (y/n) y
そうすると通常はセットアップ用のQRコードが表示されるらしいが、私の環境だと以下エラーになりシークレットキー(XXXXXXXXXXXXXXXXXXXXXの部分)を用いてセットアップを促された。
Warning: pasting the following URL into your browser exposes the OTP secret to Google:
  https://www.google.com/chart?chs=200x200&chld=11111111111111
Failed to use libqrencode to show QR code visually for scanning.
Consider typing the OTP secret into your app manually.
Your new secret key is: XXXXXXXXXXXXXXXXXXXXX
Enter code from app (-1 to skip):
QRコードが表示される場合は通常通りGoogle Authenticatorアプリにて登録し、シークレットキーの場合は「セットアップキーを入力」から以下で登録する。
- アカウント名 → 分かりやすい名前で登録。例:Cockpit
- 鍵 → 前述のシークレットキーを入力
- 鍵の種類 → 時間ベースのまま
登録後、以下に対してGoogle Authenticatorアプリに表示されるワンタイムパスワードを入力し、エンターで次に進める。
Enter code from app (-1 to skip):
すると以下が表示されるので緊急用スクラッチコード(xxxxxxxxx部分)はメモっておく(コメント部分は翻訳した内容)。
#コードが確認されました。
#緊急用スクラッチコードは以下の通りです:
Code confirmed
Your emergency scratch codes are:
  xxxxxxxxx
  xxxxxxxxx
  xxxxxxxxx
  xxxxxxxxx
  xxxxxxxxx
進めていくと以下を聞かれるがいずれもyで問題無さそう(コメント部分は翻訳した内容)。
#「/home/xxxxx/.google_authenticator」ファイルを更新しますか?
Do you want me to update your "/home/xxxxx/.google_authenticator" file? (y/n)

#同じ認証トークンの複数回使用を禁止しますか?
#これにより、約30秒に1回のログインに制限されますが、中間者攻撃を検知したり、防止したりできる可能性が高まります。
Do you want to disallow multiple uses of the same authentication
token? This restricts you to one login about every 30s, but it increases
your chances to notice or even prevent man-in-the-middle attacks (y/n)

#デフォルトでは、モバイルアプリによって30秒ごとに新しいトークンが生成されます。
#クライアントとサーバー間で生じうる時刻のずれを許容するため、現在時刻の前後におけるトークンも有効として扱われます。
#これにより、認証サーバーとクライアント間で最大30秒の時刻のずれがあっても対応可能です。
#時刻同期の問題が発生する場合は、許容範囲(ウィンドウ)をデフォルトの3つのコード(直前のコード、現在のコード、次のコード)から17つのコード(過去8つのコード、現在のコード、未来の8つのコード)に拡大できます。
#これにより、クライアントとサーバー間で最大4分間の時刻のずれが許容されます。
#この設定変更を行いますか?
By default, a new token is generated every 30 seconds by the mobile app.
In order to compensate for possible time-skew between the client and the server,
we allow an extra token before and after the current time. This allows for a
time skew of up to 30 seconds between authentication server and client. If you
experience problems with poor time synchronization, you can increase the window
from its default size of 3 permitted codes (one previous code, the current
code, the next code) to 17 permitted codes (the 8 previous codes, the current
code, and the 8 next codes). This will permit for a time skew of up to 4 minutes
between client and server.
Do you want to do so? (y/n)

#ログインしようとしているコンピュータがブルートフォース攻撃によるログイン試行に対して強化されていない場合、認証モジュールのレート制限を有効にすることができます。
#デフォルトでは、攻撃者によるログイン試行回数は30秒ごとに3回までに制限されます。
#レート制限を有効にしますか?
If the computer that you are logging into isn't hardened against brute-force
login attempts, you can enable rate-limiting for the authentication module.
By default, this limits attackers to no more than 3 login attempts every 30s.
Do you want to enable rate-limiting? (y/n)
Cockpit用のPAM設定
引き続き以下コマンドを実行する。
#設定ファイルを開く
vi /etc/pam.d/cockpit

#以下を追記して:qで上書き保存する
auth required pam_google_authenticator.so nullok

#Cockpitの再起動
systemctl restart cockpit
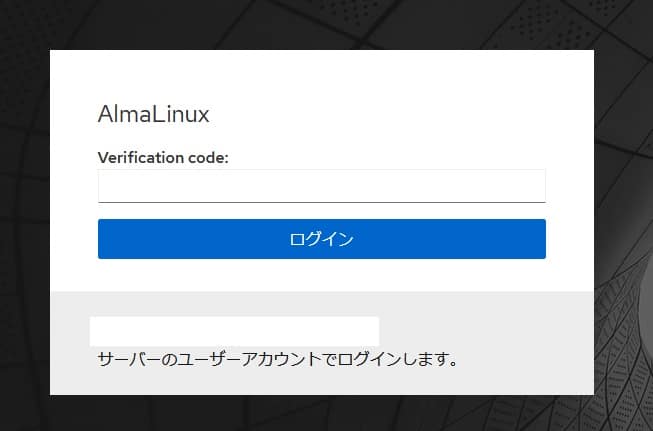
この時点でCockpitにアクセスしようとすると最初はユーザー&パスワード認証があり、次に進めると以下の通りワンタイムパスワード認証が入る筈。
関連記事
-

-
Podmanでデータベース用コンテナを作成しWebサーバ用コンテナと接続する方法
Podmanでデータベース用コンテナを作成し、Webサーバ用コンテナからPHPで ...
-

-
AlmaLinux9系にホスト側NginxとPodmanコンテナ環境を構築する方法
AlmaLinux8系から9系に移行し、さらにLAMP環境からPodmanコンテ ...
-

-
サーバ管理ツール「Cockpit」にファイルマネージャー用プラグインを導入する方法
先日メモしたサーバ管理ツール「Cockpit」にブラウザ上からファイルの作成や編 ...
-
-
Cockpitでプログラムの自動実行(systemd timer)設定を行う方法
Cockpitでプログラムの自動実行設定を行いたい。調べたところCronは難しそ ...
-
-
Podmanでイメージのビルド中に「Writing manifest to ~~」表示で処理が止まる場合の対応方法
Podmanでイメージのビルド中に「Writing manifest to im ...